First published at MoveIt 2 journey: first demonstrator in ROS 2, planning to a joint-space goal
The MoveIt motion planning framework is an open source software for motion planning, manipulation, 3D perception, kinematics, control and navigation. It is built on top of the Robot Operating System (ROS 2) and altogether, remains the third most popular package in the ROS world.
MoveIt provides an easy-to-use platform for developing advanced robotics applications, evaluating new robot designs, and building integrated robotics products for industrial, commercial, R&D, and other domains. MoveIt 2 is the ROS 2 version of MoveIt.

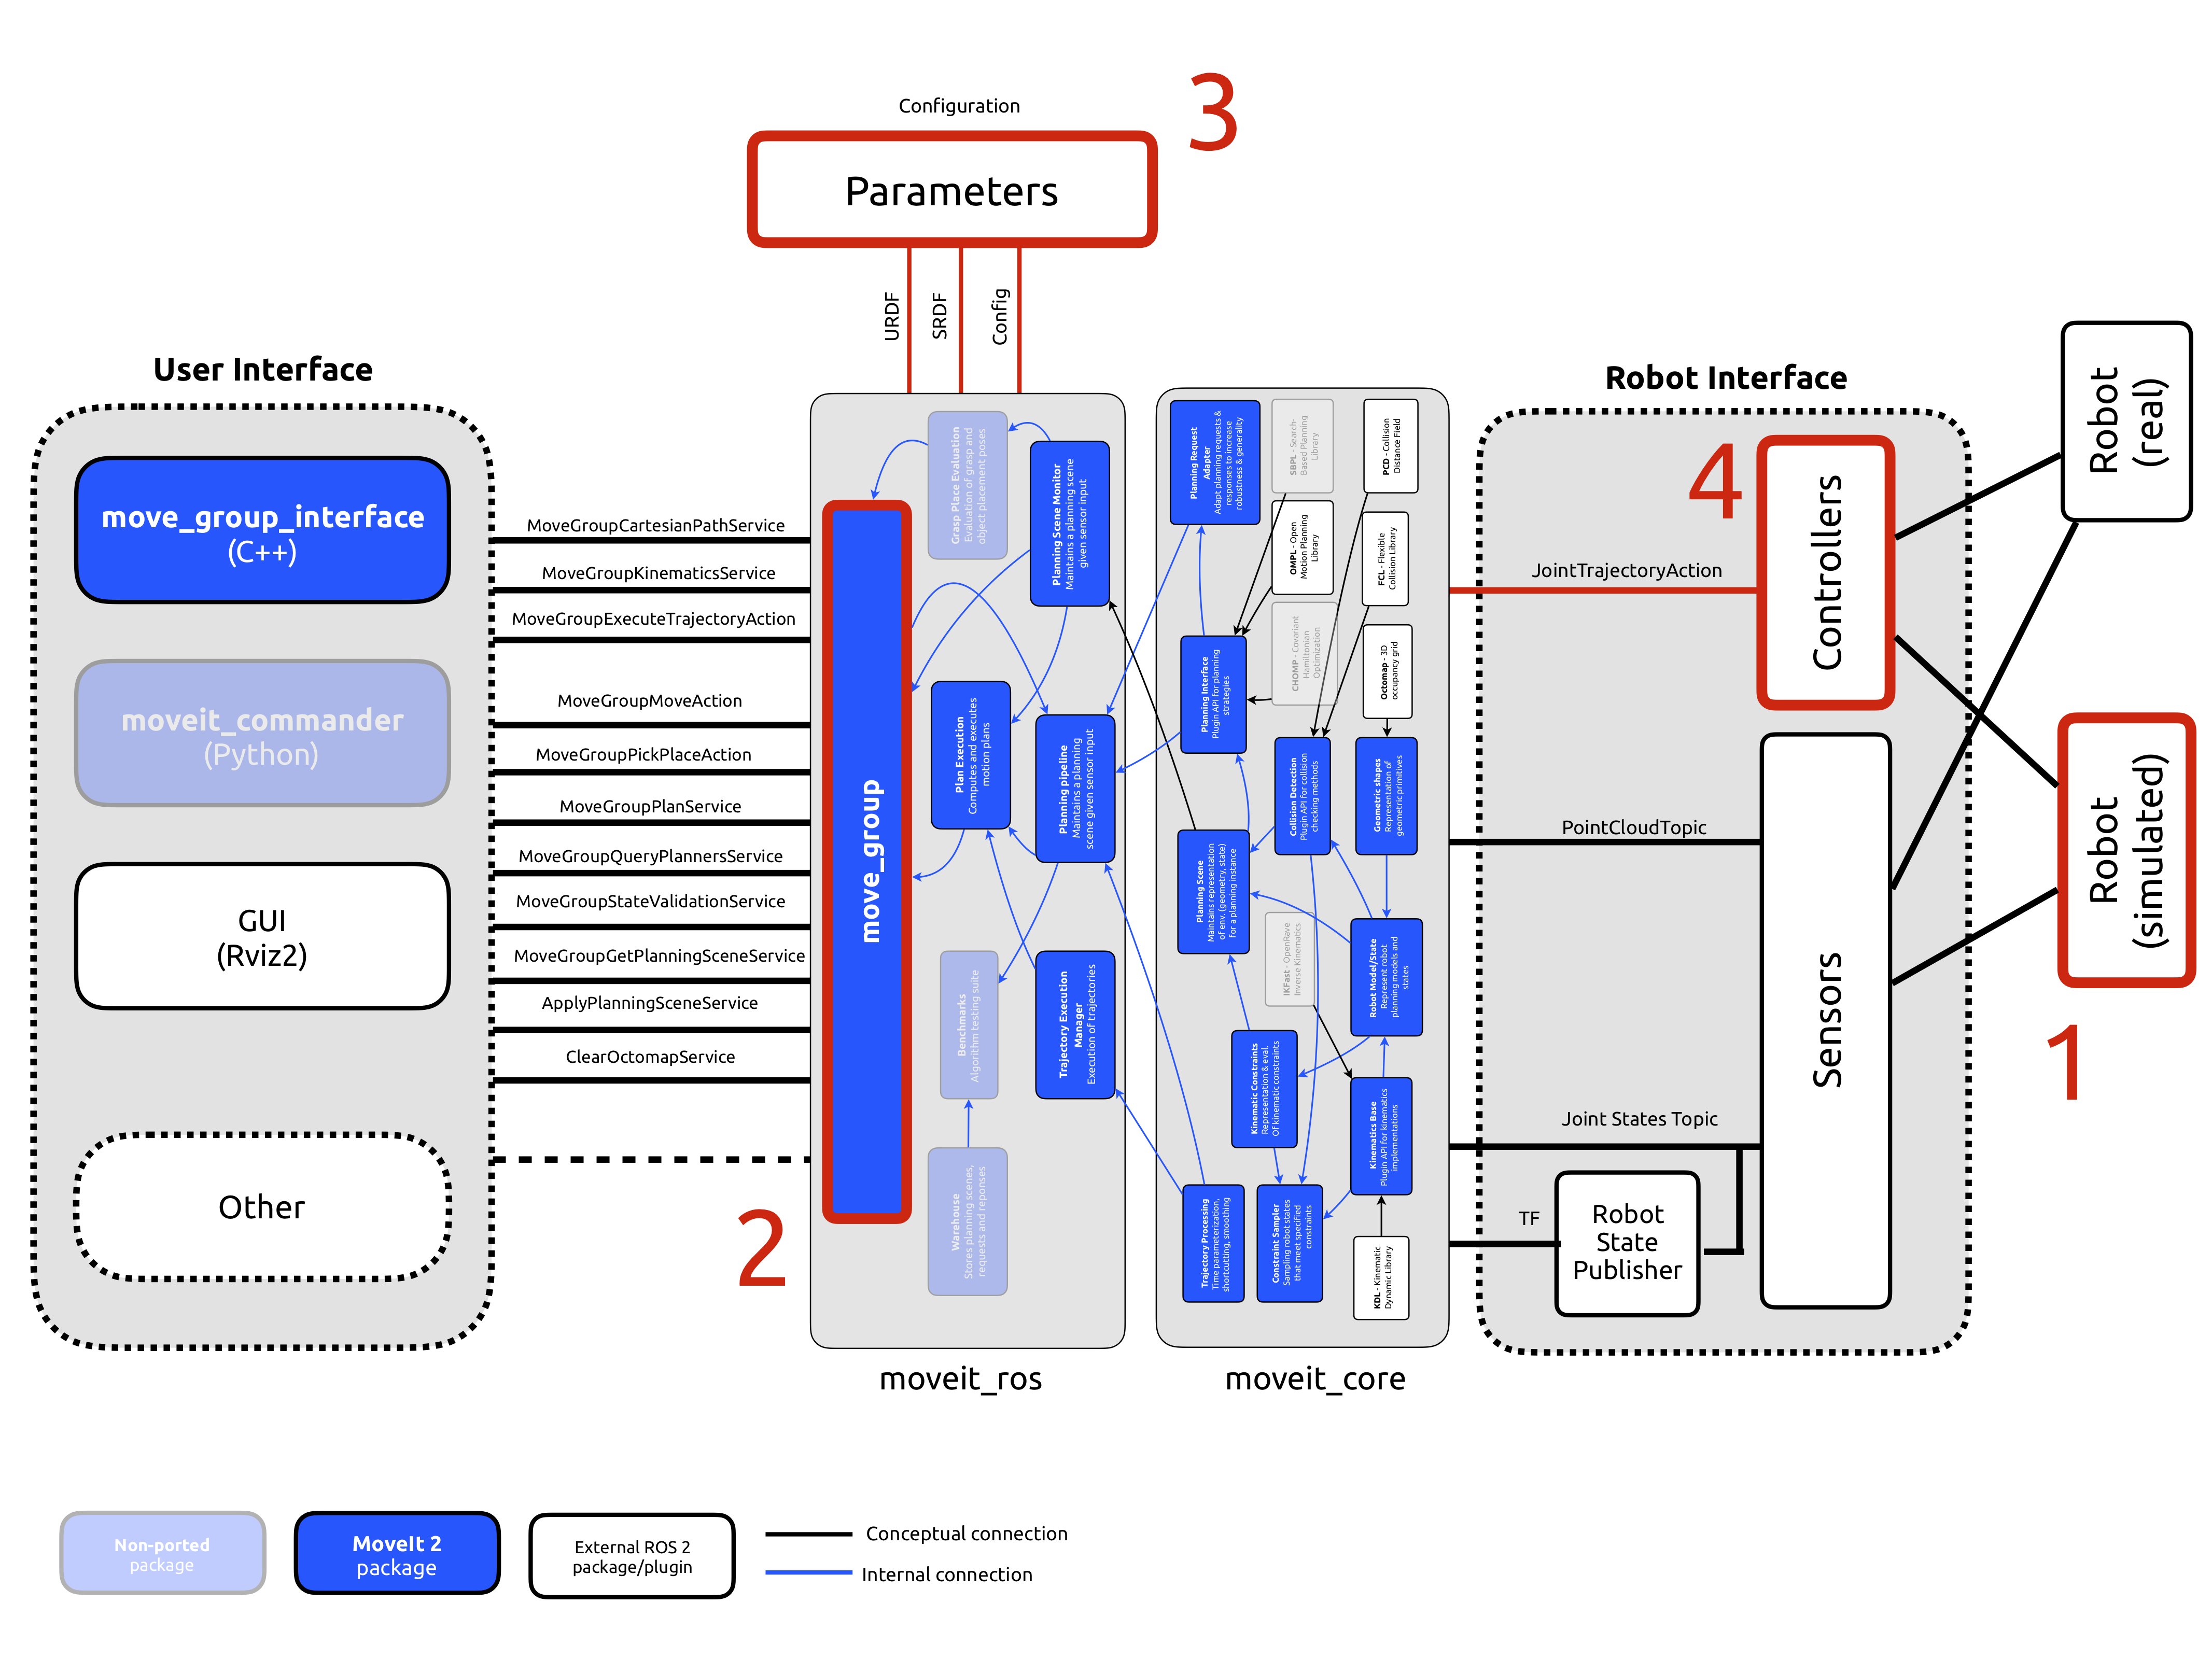
MoveIt 2 simplified architecture diagram. Inspired by Concepts | MoveIt and moveit_docs/diagram at kinetic-devel · ros-planning/moveit_docs · GitHub
This is the third of a series of articles that describe our learning experience and contributions with the MoveIt 2 and ROS 2 communities. The complete series is listed below:
- why MoveIt 2?
- porting and understanding
moveit_core - first demonstrator in ROS 2, planning to a joint-space goal ( this article )
In this third part we present the a first demonstrator of the capabilities of MoveIt 2 by showing how to plan to a joint-space goal and how to reproduce it.
Planning to a joint-space goal, a walk through on the first demonstrator for MoveIt 2

Our team has prepared a first demonstrator that allows to plan to a specific (and given) joint-space goal with MoveIt 2 . In a nutshell, we make use of the move_group_interface ported package which allows to make an easy trajectory from point A to point B with a simulated instance of MARA modular robot.
In the sections below we describe the different steps of the demonstration.
1. Simulating MARA modular robot for MoveIt 2

The first thing we do is launch the simulation of MARA (refer to the install instructions) which we open sourced a few months ago resulting in something like:
The install instructions were created for ROS 2.0 Crystal but our team has confirmed that they should be valid also for the upcoming Dashing release. Text and instructions in the MARA repository is expected to be updated in the coming weeks.
MARA modular robot simulation with Gazebo. Refer to GitHub - AcutronicRobotics/MARA: MARA, world's first modular industrial robot arm, official repository for more.
2. Launching move_group
The move_group package (or moveit_ros_move_group ) is the primary node provided by MoveIt 2 and according to the official documentation:
serves as an integrator: pulling all the individual components together to provide a set of ROS 2 actions and services for users to use.
move_group is the glue that allows connecting together the user interface and the robot interface in a manipulator using ROS 2. It can be pictures as follows:

move_group node needs to be launched independently (though often automated as part of a launch file or script we just do it manually for this first tutorial) and offers different capabilities:
static const char* DEFAULT_CAPABILITIES[] = {
   "move_group/MoveGroupCartesianPathService",
   "move_group/MoveGroupKinematicsService",
   "move_group/MoveGroupExecuteTrajectoryAction",
   "move_group/MoveGroupMoveAction",
   "move_group/MoveGroupPickPlaceAction",
   "move_group/MoveGroupPlanService",
   ...
};
MoveIt 2 capabilities (also referred as plugins in the MoveIt! official documentation) are defined here. In this first demonstrator we will be using move_group/MoveGroupMoveAction . This capability allows to compute motion plans via a ROS action.
3. Launching move_group parameters

move_group requires certain parameters so we go ahead and launch a ROS2 node that exposes those parameters while using the MARA modeling files as arguments (available at https://github.com/ros-planning/moveit_resources/pull/24 at the time of writing).
4. Launching follow_joint_trajectory_node
At this point, we have move_group node launched and configured with the right parameters to operate with the MARA robot. Next is to launch the appropriate controller for MARA which we open sourced and made available at GitHub - AcutronicRobotics/mara_ros2_control: MARA control framework for ROS 2. Pretty simple for now, right? We’ll be building on top as we keep up porting more parts of MoveIt 2 :).
If you’d like understand how simple is to control MARA in ROS 2, have a look athttps://github.com/AcutronicRobotics/mara_ros2_control/blob/master/src/FollowJointTrajectoryAction.cpp
We launch the follow_joint_trajectory_node to enable the controller for MARA simulation. With this, we have most parts of the MoveIt 2 framework launched and ready for a simple plan to execute. Let’s do that in the next step.
5. Launching move_group_interface_tutorial.launch

This is where we indicate MARA what to do using the move_group_interface (C++ API) and particularly, the MoveGroupMoveAction capability. Let’s analyze the code that does so:
complete source code is available athttps://github.com/AcutronicRobotics/mara_moveit_tutorials/blob/dashing/src/move_group_interface_tutorial.cpp
We first include all the corresponding headers required to make use of MoveIt 2 capabilities:
#include <moveit/move_group_interface/move_group_interface.h>
#include <moveit/planning_scene_interface/planning_scene_interface.h>
#include <moveit_msgs/msg/display_robot_state.hpp>
...

int main(int argc, char** argv)
{
  setvbuf(stdout, NULL, _IONBF, BUFSIZ);

  rclcpp::init(argc, argv);
  auto node = rclcpp::Node::make_shared("move_group_interface_demo");
MoveIt 2 operates on sets of joints called planning groups and stores them in an object called the JointModelGroup . Throughout MoveIt 2 the terms planning group and joint model group are used interchangably.
static const std::string PLANNING_GROUP = "manipulator";
The :move_group_interface: MoveGroup class can be easily setup using just the name of the planning group you would like to control and plan for.
moveit::planning_interface::MoveGroupInterface::Options options(PLANNING_GROUP, "robot_description", node);
moveit::planning_interface::MoveGroupInterface move_group(options);

executor_thread(std::bind(&rclcpp::executors::MultiThreadedExecutor::spin, &executor));
We will use the :planning_scene_interface: PlanningSceneInterface class to add and remove collision objects in our “virtual world” scene
moveit::planning_interface::PlanningSceneInterface planning_scene_interface(node);
Raw pointers are frequently used to refer to the planning group for improved performance.
const robot_state::JointModelGroup* joint_model_group =
      move_group.getCurrentState()->getJointModelGroup(PLANNING_GROUP);
Let’s now get some basic information. We can print the name of the reference frame for this robot.
RCLCPP_INFO(node->get_logger(), "Reference frame: %s", move_group.getPlanningFrame().c_str());
and also print the name of the end-effector link for this group.
RCLCPP_INFO(node->get_logger(), "End effector link: %s", move_group.getEndEffectorLink().c_str());
From this point on, we kick off the demonstrator and plan to a Pose goal.
We plan a motion for this group to a desired pose of the end-effector.
  geometry_msgs::msg::Pose target_pose1;

  target_pose1.orientation.w = 0.5;
  target_pose1.orientation.x = -0.5;
  target_pose1.orientation.y = -0.5;
  target_pose1.orientation.z = -0.5;

  target_pose1.position.x = -0.039;
  target_pose1.position.y = -0.156;
  target_pose1.position.z = 1.5;

  move_group.setPoseTarget(target_pose1);
Now, we call the planner to compute the plan and visualize it. Note that we are just planning, not asking move_group to actually move the robot.
moveit::planning_interface::MoveGroupInterface::Plan my_plan;

bool success;
We skip the visualization of the planning here since it’s simply not ready just yet. Instead, we jump ahead into the execution of the plan. We will set a joint space goal and move towards it. This will replace the pose target we set above.
To start, we’ll create a pointer that references the current robot’s state. RobotState is the object that contains all the current position/velocity/acceleration data.
moveit::core::RobotStatePtr current_state = move_group.getCurrentState();
Next get the current set of joint values for the group.
std::vector<double> joint_group_positions;
current_state->copyJointGroupPositions(joint_model_group, joint_group_positions);
Finally, let’s modify one of the joints, plan to the new joint space goal and visualize the plan.
joint_group_positions[0] = -1.0;  // radians
joint_group_positions[1] = .0;  // radians
joint_group_positions[2] = 1.57;  // radians
joint_group_positions[3] = .0;  // radians
joint_group_positions[4] = .0;  // radians
joint_group_positions[5] = .0;  // radians

move_group.setJointValueTarget(joint_group_positions);

success = (move_group.plan(my_plan) == moveit::planning_interface::MoveItErrorCode::SUCCESS);
RCLCPP_INFO(node->get_logger(), "Visualizing plan 2 (joint space goal) %s", success ? "" : "FAILED");

printf("%d %d %d\n",  my_plan.start_state_.joint_state.name.size(),  my_plan.start_state_.joint_state.position.size(),  my_plan.start_state_.joint_state.velocity.size());

for(int i = 0; i < my_plan.start_state_.joint_state.name.size(); i++) {
    printf("%s %.5f\n", my_plan.start_state_.joint_state.name[i].c_str(), my_plan.start_state_.joint_state.position[i]);
}

 for(int i = 0; i <  my_plan.trajectory_.joint_trajectory.points.size(); i++) {
    for(int j = 0; j <  my_plan.trajectory_.joint_trajectory.points[i].positions.size(); j++) {
      printf("%.5f\t",  my_plan.trajectory_.joint_trajectory.points[i].positions[j]);
    }
    printf("\n");
    printf("time_from_start %u %u\n", my_plan.trajectory_.joint_trajectory.points[i].time_from_start.sec, my_plan.trajectory_.joint_trajectory.points[i].time_from_start.nanosec);
  }

move_group.execute(my_plan);

rclcpp::shutdown();
  return 0;
}
We’ve prepared an environment that lets you reproduce it. See the next section if you’re interested.
Reproducing MoveIt 2 first demonstrator
Below, we provide instructions on how to reproduce the first demonstrator. The instructions assume you’re working in Ubuntu 18.04 and already have a ROS 2 Dashing Diademata installation (instructions) as well as Gazebo 9 :

Install MARA simulation
Full instructions on how install MARA simulation are available here. You can quickly get up to speed with:
mkdir -p ~/ros2_mara_dashing/src
cd ~/ros2_mara_dashing
wget https://raw.githubusercontent.com/AcutronicRobotics/MARA/dashing/mara-ros2.repos
vcs import src < mara-ros2.repos
cd ~/ros2_mara_dashing/src/HRIM
hrim generate models/actuator/servo/servo.xml
hrim generate models/actuator/gripper/gripper.xml
cd ~/ros2_mara_dashing
colcon build --merge-install --packages-skip individual_trajectories_bridge
Launch MARA simulation
export ROS_DOMAIN_ID=7
export RMW_IMPLEMENTATION=rmw_opensplice_cpp
ros2 launch mara_gazebo mara.launch.py
Run first MoveIt 2 demonstrator
# Run the docker container of the MoveIt 2 first demonstrator
docker run --rm -it --net=host --name moveit2 acutronicrobotics/moveit2:dashing-alpha

# Launch a simple plan to a joint-space goal
docker exec -it moveit2 bash /root/run_execute.bash